Copyright: christophe.cerin@univ-paris13.fr - April 16, 2020.
You have always dreamed about hosting a cloud service like Google's at home, in order to edit online, to work collaboratively, to share photos... Nextcloud is maybe the ideal solution for you to attract people (friends, colleagues, family...) in order to using your own cloud.
Nextcloud is a free and open source suite of client-server software for creating and using basically file hosting services. It is based on LAMP (Apache, PHP, MySQL-like) stack. On January 17, 2020, version 18 was presented in Berlin under the product name Nextcloud Hub. For the first time, an office package (here OnlyOffice) was directly integrated here and Nextcloud announced as its goal direct competition with Microsoft Office 365 and Google Docs. OnlyOffice can be use as a standalone product, on you desktop PC, or integrated into Nextcloud. In this note, we discuss about this issue.
First LAMP. LAMP (Linux, Apache, MySQL, PHP/Perl/Python) is a very common example of a web service stack, named as an acronym of the names of its original four open-source components: the Linux operating system, the Apache HTTP Server, the MySQL relational database management system (RDBMS), and the PHP programming language. The LAMP components are largely interchangeable (in using MariaDB or Postgresql) and not limited to the original selection. As a solution stack, LAMP is suitable for building dynamic web sites and web applications.
Apache is the Web server. It calls PHP scripts that requests for data in the database, makes some calculation on the data, then generates HTML code which is sent back to the requester. In short, PHP is a server-side scripting language designed for web development but also used as a general-purpose programming language. PHP code is interpreted by a web server via a PHP processor module, which generates the resulting web page. PHP commands can optionally be embedded directly into an HTML source document rather than calling an external file to process data.
To be honest, the Nextcloud server is written in the PHP and JavaScript scripting languages. For remote access, it employs sabre/dav, an open-source WebDAV server. Nextcloud is designed to work with several database management systems, including SQLite, MariaDB, MySQL, Oracle Database, and Postgresql. With Nextcloud, you get browser-based text editing (OnlyOffice), calendars (CalDAV), contacts (CardDAV), streaming media (Ampache), ohotos gallery; RSS feed reader, document viewer tools from within Nextcloud, connection to Dropbox, Google Drive and Amazon S3, Web analytics (Use of Matomo (software)), Integration of Content management systems e.g. Pico CMS, Viewer for Weather forecasting, Viewer for DICOM (medical imaging), Viewer for Maps.
As it is said on the Nextcloud web site, MacOS port is not as good as the Linux one. This is challenging. First we need to install Apache, PHP and MySQL. To do this, you need Homebrew (If not already installed, then do it now like described on the website of Homebrew).
  Stop and unload the mac system built-in apache
  $ sudo apachectl stop
  $ sudo launchctl unload -w /Systems/Library/LaunchDaemons/org.apache.httpd.plist

  Install the httpd formula with Homebrew
  $ brew install httpd
  By the way httpd is the same as Apache2.

  Start background service and start Apache
  $ brew services start httpd
  $ sudo apachectl start

  When opening http://localhost:8080/ you should see a beaufifull page.
Open in your favorite editor the file /usr/local/etc/httpd/httpd.conf. Find and replace configs from -> to:
  Listen 8080 -> Listen 80

  DocumentRoot "/usr/local/var/www" -> DocumentRoot "/usr/local/var/www/nextcloud"

  <Directory "/usr/local/var/www"> ->  <Directory "/usr/local/var/www/nextcloud">

  Inside the previously edited <Directory "/usr/local/var/www/nextcloud">
  AllowOverride None -> AllowOverride All

  #LoadModule rewrite_module lib/httpd/modules/mod_rewrite.so️ ->
  LoadModule rewrite_module lib/httpd/modules/mod_rewrite.so

  User _www -> User YOUR_USERNAME (your login name)

  Group _www -> Group staff

  #ServerName www.example.com:8080 -> ServerName localhost:80
After saving your changes in the httpd.conf file you need to restart your apache server with sudo apachectl restart. After that you can open http://localhost and should see the index.html content from your nextcloud directory. For that put an index.html file like this:
sudo echo "Hello from my site!" > /usr/local/var/www/nextcloud/index.html
  Install the php formula with Homebrew.
  $ brew install php

  Start PHP background service
  $ brew services start php
Open in your favorite editor the file /usr/local/etc/httpd/httpd.conf. Find and replace configs from -> to:
  Insert after the last LoadModule (probably mod_rewrite.so):
  LoadModule php7_module /usr/local/opt/php/lib/httpd/modules/libphp7.so

  DirectoryIndex index.html ->  DirectoryIndex index.html index.php

  Insert after the previously edited "DirectoryIndex" area and before
  the htaccess/htpasswd "IfModule" area:
  <FilesMatch \.php$>
    SetHandler application/x-httpd-php
  </FilesMatch>

  Restart your Apache server $ sudo apachectl restart
  Install the mysql formula with Homebrew.
  $ brew install mysql

  Start the Homebrew MySQL daemon
  $ brew services start mysql
  Run $ mysql_secure_installation to start configuring MySQL

  Now go through the procedure and set the configs as required.
  I suggest this config:
  "Would you like to setup VALIDATE PASSWORD component?": n
  "password for root": 1234 or a better one!
  "Remove anonymous users?": y
  "Disallow root login remotely?": y
  "Remove test database and access to it?": y
  "Reload privilege tables now?": y

  You can start, stop and restart mysql with the Homebrew services
  command like this: $ brew services start|stop|restart mysql.
If you'd like to test to connect PHP with your MySQL you can do it like described on this W3Schools Site. I suggest a simple testing with a table creation, insertion as follows (replace the information at the top by the correct one for the username and password). Put this index.php file in directory and then connect on http://localhost/index.php
<?php
  $servername = "localhost";
  $username = "username";
  $password = "password";

  // Create connection
  $conn = new mysqli($servername, $username, $password);
  // Check connection
  if ($conn->connect_error) {
        die("Connection failed: " . $conn->connect_error);
  }

  // sql to create table
  $sql = "CREATE TABLE MyGuests (
          id INT(6) UNSIGNED AUTO_INCREMENT PRIMARY KEY,
          firstname VARCHAR(30) NOT NULL,
          lastname VARCHAR(30) NOT NULL,
          email VARCHAR(50),
          reg_date TIMESTAMP DEFAULT CURRENT_TIMESTAMP ON UPDATE CURRENT_TIMESTAMP
  )";

  if ($conn->query($sql) === TRUE) {
     echo "Table MyGuests created successfully";
  } else {
     echo "Error creating table: " . $conn->error;
  }

  $sql = "INSERT INTO MyGuests (firstname, lastname, email)
  VALUES ('Christophe', 'Cerin', 'christophe.cerin@univ-paris13.fr')";
  $sql .= "INSERT INTO MyGuests (firstname, lastname, email)
  VALUES ('Mary', 'Moe', 'mary@example.com');";
  $sql .= "INSERT INTO MyGuests (firstname, lastname, email)
  VALUES ('Julie', 'Dooley', 'julie@example.com')";

  if ($conn->query($sql) === TRUE) {
    echo "New record created successfully";
  } else {
    echo "Error: " . $sql . "<br>" . $conn->error;
  }

  $sql = "SELECT id, firstname, lastname FROM MyGuests";
  $result = $conn->query($sql);

  if ($result->num_rows > 0) {
     // output data of each row
    while($row = $result->fetch_assoc()) {
       echo "id: " . $row["id"]. " - Name: " . $row["firstname"]. " " . $row["lastname"]. "<br>";
    }
  } else {
    echo "0 results";
  }

  $conn->close();
?>
I decided to install Nextcloud according to the distribution available on the web (Download for server). The zip archive was unfolded in the /usr/local/var/www/nextcloud directory. You get the following files and, new index.* files because this operation erases the previous ones, those used for testing the PHP/MySQL tools:
MinideCristophe:nextcloud christophecerin$ pwd
/usr/local/var/www/nextcloud
MinideCristophe:nextcloud christophecerin$ ls
3rdparty  console.php  index.html    ocs            robots.txt
AUTHORS   core         index.php     ocs-provider  status.php
COPYING   cron.php     lib           public.php     themes
apps      data         occ           remote.php     updater
config    etc          ocm-provider  resources      version.php
MinideCristophe:nextcloud christophecerin$
You need to change the permission and group of the unarchived files, all the files:
$ chown -R YOUR_NAME:staff /usr/local/var/www/nextcloud
This operation is very important. Otherwise, you will get errors because the permissions are not correct. To check errors, you can examine the /usr/local/var/log/httpd/access_log /usr/local/var/log/httpd/error_log and /usr/local/var/www/nextcloud/data/nextcloud.log files.
Then you can connect on http://localhost. A menu will appear and you will prompted to configure the access of the database. This automatic procedure is very convenient. It will generate a /usr/local/var/www/nextcloud/config/config.php file. You can also use this file after adaptations for your case (I use 192.168.1.61 to host Nextcloud):
MinideCristophe:config christophecerin$ cat config.php
<?php
  $CONFIG = array (
  'trusted_domains' =>
     array (
       0 => '192.168.1.61',
       1 => 'XXXXX.dns-orange.fr',
       2 => 'localhost',
  ),
  'datadirectory' => '/usr/local/var/www/nextcloud/data',
  'version' => '18.0.3.0',
  'dbtype' => 'mysql',
  'dbhost' => 'localhost',
  'dbname' => 'nextcloud',
  'dbuser' => 'XXXXX,
  'dbpassword' => 'XXXXX',
  'dbtableprefix' => 'oc_',
  'installed' => true,
  'default_language' => 'fr',
  'force_language' => 'fr',
  'skeletondirectory' => '/usr/local/var/www/nextcloud/core/skeleton',
  'log_type' => 'file',
  'logfile' => '/usr/local/var/www/nextcloud/data/nextcloud.log',
  'logfilemode' => 416,
  'loglevel' => 2,
  'syslog_tag' => 'Nextcloud',
  'logdateformat' => 'F d, Y H:i:s',
  'logtimezone' => 'Europe/Berlin',
  'log_query' => false,
  'log_rotate_size' => 104857600,
  'customclient_desktop' => 'https://nextcloud.com/install/#install-clients',
  'customclient_android' => 'https://play.google.com/store/apps/details?id=com.nextcloud.client',
  'customclient_ios' => 'https://itunes.apple.com/us/app/nextcloud/id1125420102?mt=8',
  'customclient_ios_appid' => '1125420102',
  'appstoreenabled' => true,
  'apps_paths' =>
  array (
  0 =>
  array (
  'path' => '/usr/local/var/www/nextcloud/apps',
  'url' => '/apps',
  'writable' => true,
  ),
  ),
  'enable_previews' => true,
  'mysql.utf8mb4' => true,
  'supportedDatabases' =>
  array (
  0 => 'mysql',
  1 => 'mysql',
  2 => 'pgsql',
  3 => 'oci',
  ),
  'tempdirectory' => '/tmp/nextcloudtemp',
  'instanceid' => 'ocvnf8q9w7z9',
  'passwordsalt' => '1jpF+eUF/BrPS7sBOjOnbmbuPn2CSI',
  'secret' => 'lwB7OyvGZuOe/wHjivIKd2Ofj6ulHUyKYekYev59zEBg+QbZ',
  'overwrite.cli.url' => 'http://192.168.1.61',
  'dbport' => '',
  'maintenance' => false,
  );
Last but not least, you need a special adaptation in order to be able to run OnlyOffice on MacOS. The distribution of the main site contains executable files that are incompatible with the MacOS binaries. They are suited for Linux or Windows. After installing OnlyOffice for MacOS, I just made a link, on Nextcloud side, to point to the correct binaries:
MinideCristophe:FileConverter christophecerin$ pwd
/usr/local/var/www/nextcloud/apps/documentserver_community/3rdparty/onlyoffice/documentserver/server/FileConverter
MinideCristophe:FileConverter christophecerin$ ll
total 16
drwxr-xr-x   8 christophecerin  staff   256 15 avr 15:09 .
drwxr-xr-x   8 christophecerin  staff   256 15 avr 13:36 ..
drwxr-xr-x  22 christophecerin  staff   704 15 avr 13:36 BIN.old
lrwxr-xr-x   1 christophecerin  staff    57 15 avr 15:09 bin -> /Applications/ONLYOFFICE.app/Contents/Resources/converter
drwxr-xr-x  17 christophecerin  staff   544 15 avr 13:36 node_modules
-rw-r--r--   1 christophecerin  staff  3664 15 avr 13:36 package-lock.json
-rw-r--r--   1 christophecerin  staff   240 15 avr 13:36 package.json
drwxr-xr-x   4 christophecerin  staff   128 15 avr 13:36 sources
MinideCristophe:FileConverter christophecerin$
Note that the BIN.old directory
corresponds to the original bin directory coming with the standard
distribution. To create the link I have used the ln -s
/Applications/ONLYOFFICE.app/Contents/Resources/converter bin
Unix command in the FileConverter directory. This update is not (yet)
documented on the Nextcloud site, to the best of my knowledge.
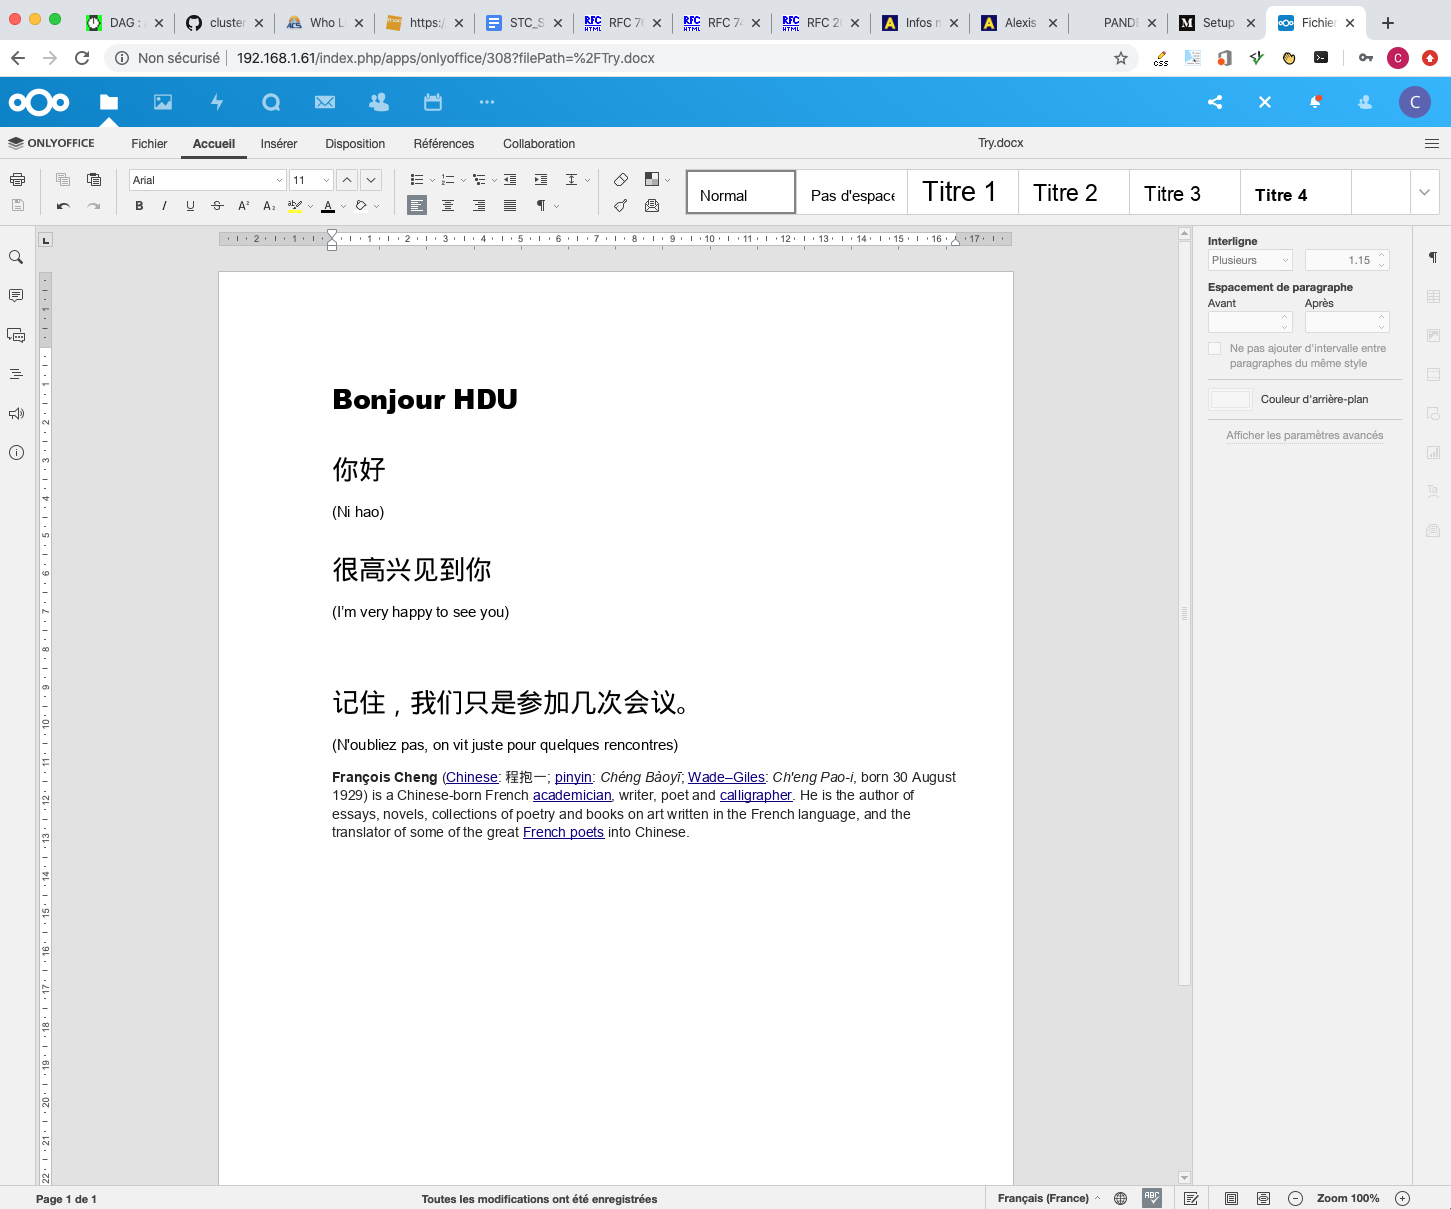
Finally, your Nextcloud instance is ready to use as you can observe on
the next picture.
Copyright: christophe.cerin@univ-paris13.fr - April 16, 2020.